Supplier Portal
The Supplier Portal is your command center for managing everything related to your vendors and incoming goods. Instead of digging through hundreds of emails and spreadsheets, the portal brings your entire upstream supply chain into one visual dashboard.
Whether you are negotiating a new deal, checking stock levels at a supplier's warehouse, or virtually packing a container, the Supplier Portal ensures you and your vendors are always looking at the same data in real-time.
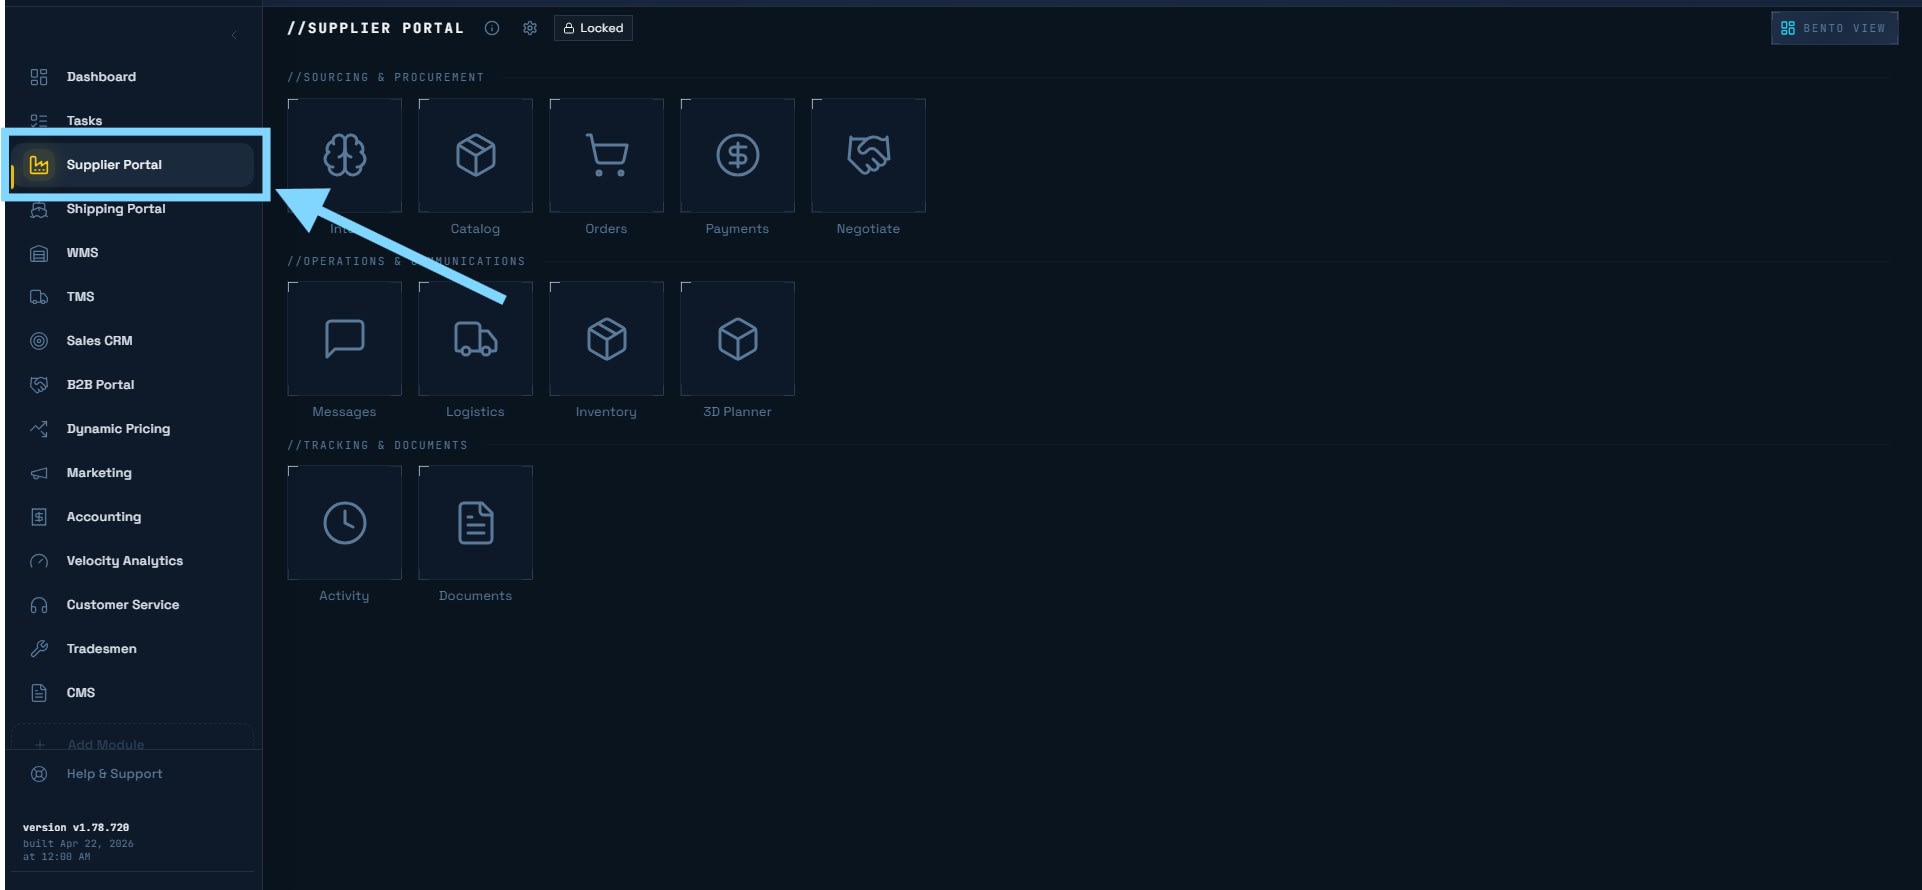
Quick Guide to Supplier Portal Dashboard
To help you find what you need quickly, we have organized the portal into three main sections:
1. Sourcing & Procurement - The "Deal-Making" Phase.
- Intel: View supplier performance grades and historical reliability.
- Catalogue: Manage your master product list, including prices and dimensions.
- Orders: Create, track, and manage your Purchase Orders (POs).
- Payments: View invoices and track what has been paid vs. what is outstanding.
- Negotiate: Use our live bidding tool to finalize pricing and terms with vendors.
2. Operations & Communications - The "Getting it Done" Phase.
- Messages: Chat directly with your suppliers regarding specific orders or items.
- Logistics: Coordinate how and when your goods will be picked up.
- Inventory: See live stock levels available at your supplier's location.
- 3D Planner: A visual tool to "test-pack" your orders into containers to maximize space.
3. Tracking & Documents - The "Compliance & History" Phase.
- Activity: A complete audit trail of every change made within the portal.
- Documents: Your digital filing cabinet for Commercial Invoices, Packing Lists, and Certificates.
Intel
Think of the Intel section as your company’s "Source of Truth" for every vendor you work with. Managing a global supply chain is hard. You often face scattered contact details. You may guess at shipping lead times. It is easy to lose track of where your goods originate.
The Intel module solves these problems by centralizing everything in one place. You get a clear view of your supplier’s reliability, location, and logistics defaults. This leads to faster decision-making and fewer "surprises" during the shipping process.
Getting your supplier data right here ensures the rest of the OLT Solutions platform works perfectly for you.
- Setting Up the Logistics Snapshot: You need to define your Origin Port and Lead Time here. Why? Because when you create an order later, the system will automatically use these details to plan your shipping schedule.
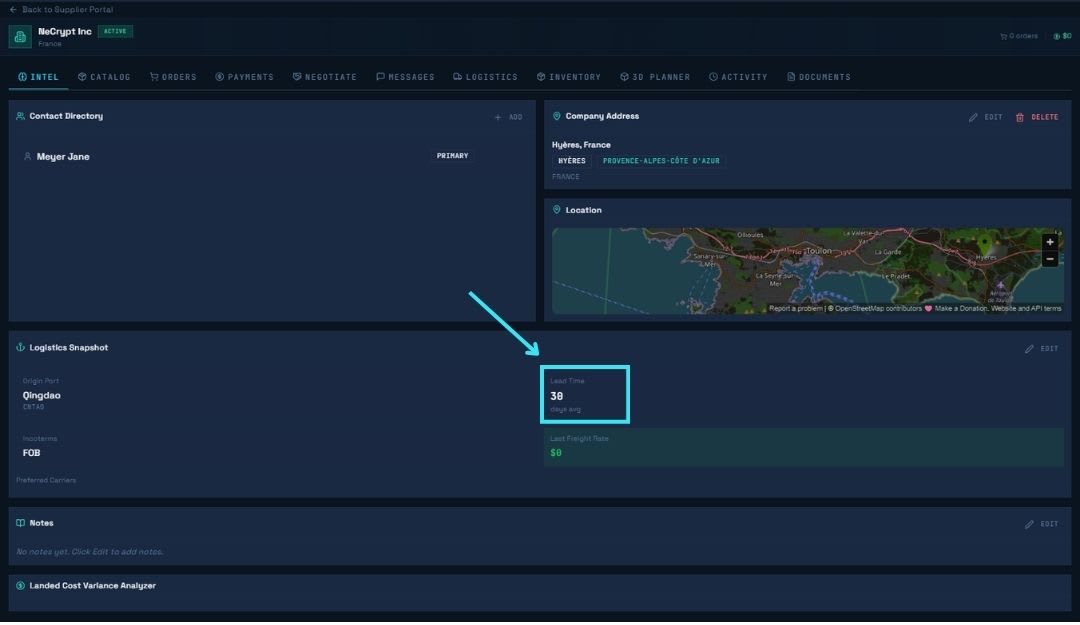
- Managing Your Directory: You can add multiple contacts for a single supplier. We recommend labeling a "Primary Contact" so your team knows exactly who to call for urgent production updates.
- Using the Map: Use the live map to check the factory's distance from the port. This helps estimate "Inland Tracking" time before goods reach the ship.
- Tracking Landed Cost: At the bottom of your Intel page, see the Landed Cost Variance. This shows if total costs (product + shipping + duties) are changing. This helps protect your profit margins.
Catalog
The Catalog is the heart of your procurement process. Instead of managing spreadsheets that quickly become outdated, the Catalog provides you with a live, high-level view of every product you source from a specific vendor.
By maintaining an accurate Catalog, you solve the problem of "Data Silos." Your logistics team will know exactly how much a product weighs, your warehouse team will know the CBM for storage planning, and your procurement team will always see the most recent unit price. The benefit to you is complete operational harmony—from the moment you browse a product to the moment it hits your warehouse shelves.
Navigating and Managing Your Products
1. Analyzing Your Catalog Performance: At the top of your Catalog screen, you are greeted with a "Product Intelligence" bar. This gives you an instant snapshot of your sourcing scale.
- Total Products: The number of unique items you source from this supplier.
- Avg. Price: Helps you track the average cost per item to monitor inflation or bulk-buying power.
- Imported / Linked: Shows you how many items are currently synced with your main inventory system.
2. Understanding the Product Table
Your product list shows detailed data without clutter. Each row has key information:
- SKU & Name: Your unique ID and product description.
- Price & MOQ: See the unit cost and Minimum Order Quantity needed to place an order.
- Logistics Data (Weight & CBM): This is vital. The system uses these numbers to calculate how many items fit in a container.
- HS Code: This is needed for international shipping and customs clearance.
3. Managing Actions
On the right side of every product, you have Actions. You can view deeper specifications or archive items that are no longer being produced.
Orders
The Orders section is your mission control for the entire purchasing lifecycle. Managing international buy orders usually involves a messy trail of spreadsheets and disparate emails—the Orders module replaces that chaos with a single, synchronized source of truth.
By using this, you solve the problem of status ambiguity and data fragmentation. You can track every Purchase Order (PO) from a rough draft to final reception. The benefit to you is total visibility over your supply chain spend, automated volume calculations for better logistics planning, and a clear historical record of everything you have ever bought.
Creating and Managing Your POs
1. Creating a New Purchase Order (PO)
When you are ready to buy, the Create PO button (top right) initiates a simple 3-step wizard that ensures no data is missed.
- Supplier Info: Set your Expected Delivery Date and select your Incoterms (e.g., FOB). This tells the system who is responsible for the freight.
- Line Items: Browse your catalog and add products. As you add items, watch the Total CBM and Total Weight update in real-time.
- Review: Double-check your totals before hitting "Create Order."
2. Understanding Order Statuses
Use the status tabs to filter your view and focus on what matters now:
- Sent/Dispatched: These are live orders currently being handled by your supplier or the shipping line.
- Partially Received: Use this to find orders where only part of the cargo has arrived at your warehouse.
- Cancelled: A record of orders that were stopped before completion.
3. Analyzing "Previously Ordered" Items
Switch to the Previously Ordered tab to see your purchase history. This view shows your Total Spent and Unique Products count. It is a good place to review your most popular SKUs for re-ordering.
Payments
Managing international payments is one of the most complex parts of importing. The Payments section is designed to give you total clarity over your financial obligations to your suppliers.
By using this, you solve the problem of currency confusion and overdue invoices. Instead of manually calculating exchange rates or tracking which orders are missing invoices in a spreadsheet, the system provides a live financial dashboard. The benefit to you is a healthier cash flow and stronger supplier relationships built on timely, accurate payments.
Managing Your Balances & Conversions
1. Monitoring Your Financial Health
Your screen shows your Financial Summary Cards. These cards show your current liabilities at a glance.
- Outstanding (USD/CAD): See exactly how much you owe in each currency.
- Overdue: This metric highlights payments past their due date. Use it to prioritize urgent payments.
- USD/CAD Rate: This is the live or set exchange rate used for your conversions.
2. Using the Currency Converter
We built a Currency Converter directly into your dashboard for global vendors. This tool lets you simulate payments. You can understand your costs in your local currency before making a bank transfer.
3. Identifying Missing Invoices
The Received Orders (No Invoice) section is your safety net. It lists goods that have physically arrived at your warehouse but have not yet been billed by the supplier. This ensures you never have "unrecorded liabilities" in your accounting.
Negotiate
The Negotiate section is your digital boardroom. In importing, prices and bulk discounts change often. Usually, these talks are lost in scattered emails or apps.
The Negotiate module brings these talks into your ERP. It solves the problem of lost paper trails and unverified price changes. You get a central record of your "Target" vs. "Current" pricing. This helps you track savings from vendor management.
Managing Active Negotiations
When you start a negotiation for an SKU, it shows in your Active Negotiations list. This gives you a clear view of potential wins.
- Target vs. Current: Compare the "Current" price from the Catalog with your "Target" price.
- Potential Savings: The system calculates total savings based on the quantity (Qty) you plan to buy.
Starting a New Negotiation
Ready to push for a better price? Click the "+ START NEW NEGOTIATION" button to open the bidding console.
- Select Item: Link the negotiation to a specific SKU from your catalog.
- Set Your Target: Enter the price you want to pay.
- Log the Chat: Use the integrated messaging to explain your reasoning (e.g., "Increasing volume to 500 units").
Reviewing Negotiation History
Finalized deals move to the Negotiation History section. This provides proof for future deals. If a supplier raises prices later, you have evidence of your previous agreements.
Messages
Communication is the glue that holds your supply chain together. The Messages section is your dedicated portal for direct dialogue with your suppliers.
By using this module, you solve the problem of "Information Silos." When conversations happen in private emails, other team members are left in the dark. In the Messages portal, every inquiry regarding a production delay, a price change, or a shipping update is logged against the supplier profile. The benefit to you is total transparency—anyone on your team can pick up where a conversation left off, ensuring your vendors always receive a consistent and timely response.
Connecting with Your Vendors
Starting a Conversation
When you need to reach out to a supplier, the process is simple and direct. You can initiate a new thread by clicking "+ START CONVERSATION" or "+ NEW MESSAGE."
- Select the Recipient: Choose which supplier contact you are messaging.
- Subject Line: Give your message a clear title (e.g., "Delay on PO-2026-0012").
- The Message: Type your inquiry and hit send.
Tracking Thread History
Your messages are organized by supplier. Select a vendor from the left sidebar to see all sent and received messages. This creates a "Paper Trail" you can check later if there is a dispute over terms or instructions.
Where this runs in OLT Solutions
These pages document the OLT product area this article covers.
- Supplier portal What the supplier portal module covers for supplier collaboration.
- Contact OLT Discuss custom software, platform access, and the needs of your team.
OLT Solutions is invitation only. Email us to discuss your business and project.